Tuesday, February 21, 2006

Outer LCD Image Customization
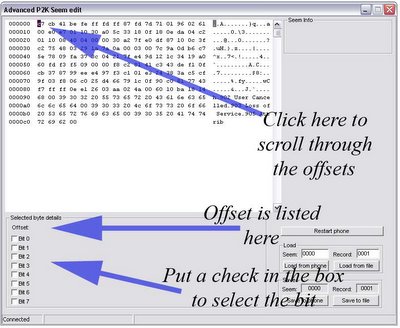
1.) Start PST
2.) Open p2k Seem
3.) Under "Load" enter seem 2771 record 0001. Click "Load from Phone"
4.) It's always a good idea to backup what you're editing, so click "Save to File" and save it somewhere safe.
5.) Starting where the arrow is pointing (at the / in the picture) enter the same as in the picture (/ a / m o b i l e / l c d . g i f). Yes, you should be entering the spaces between the characters.

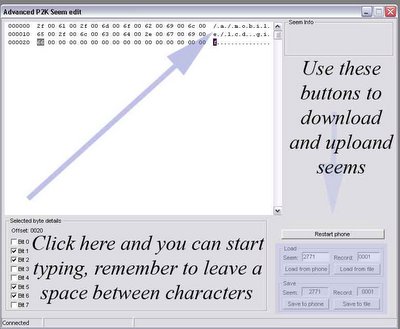
6.) Once you're done that click "Save to phone"
7.) Now load seem 2772 record 0001. Do the exact same as you did above (save it to file to backup and do the same character entering on it / a / m o b i l e / l c d . g i f). Remember to click "Save to Phone"
8.) Now load seem 275a record 0001 from the phone. Save it to file to back it up. Then set offset 0027, bit 0 to no checkmark. See the picture below for guidance.

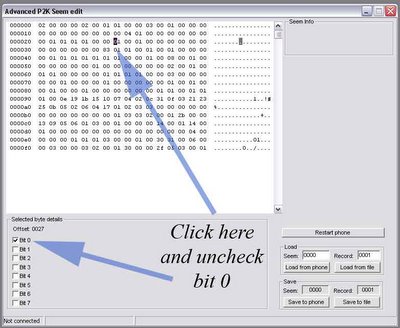
9.) Click "Save to Phone".

10.) If you restart your phone and open the flip you will see the motorola logo on the outside of the phone. Now we will put your own graphic on the phone.

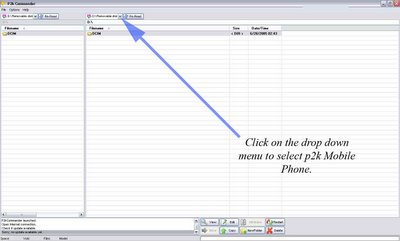
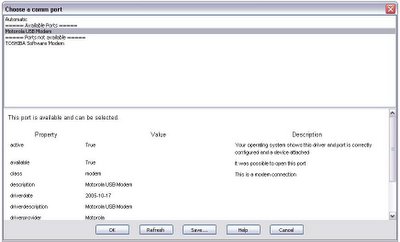
11.) Make sure you close p2k Seem. Open p2k Commander (it is a good idea to restart PST before you open p2k Commander).

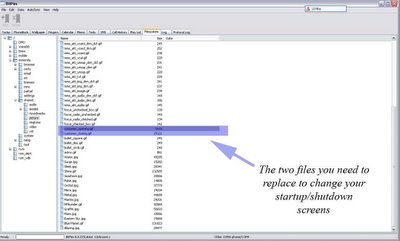
12.) On the right pane navigate to "p2k Mobile Phone". Give the computer some time to read everything that is on the phone. Once it has done double click on the "a" folder, then double click on the "mobile" folder.

13.) Now navigate to the folder, on the left pane, that has the image you are going to use as your lcd image. Make sure, as per the instructions above, that the image is called lcd.gif (otherwise you will need to change the seem editing above to reflect what the image is called). Note, the image NEEDS to be 96x80 pixels and in gif format.

14.) Select the image you wish to upload and click copy towards the middle bottom of the screen.

15.) Once the image has copied you can disconnect and restart your phone. The outside LCD image when the flip is opened should now be the image you uploaded!

Wednesday, February 15, 2006

MP3 Ringtones

Getting MP3 ringtones onto the v3c is actually quite simple. There are two ways to go about it, one is to use p2k Commander and the other is to use Bit Pim. P2k Commander is the perferred way, as it doesn't involve deleteing any files off the phone, where Bit Pim does require this.

Method 1: p2k Commander

1.) Make sure you have Motorola PST open before opening p2k Commander (you can find p2k Commander here). Some people have problems with the stability of p2k Commander, it is my recommendation that you right click on the program file and select properties. Click the "Compatability" tab and set it to run under compatibility mode for "Windows 98". Once the program is open make sure to click the "Options" button beside "File" at the top left of the screen. Move the slider in the options all the way to the right so that the "Number of Files to load" shows "Unlimited".

2.) On the right pane of the program click on the drop down menu beside the "re-read button" and select "p2k Mobile Phone". This will cause the program to read the contents of your mobile phone. Be warned, you may see an error in the bottom left of the screen in regards to "Volume Name Fail", just ignore this. It will take the phone a minute to read all the contents and display it on the screen.


3.) Once the green status bar at the bottom right of the screen has move all the way to the right you can double click on the "a" folder which is displayed in the right pane. Then double click on "motorola", then "shared" and then "audio". You will now find yourself in the phone's audio folder (a/motorola/shared/audio/). Using the left pane navigate to where the ringtones are on your computer that you wish to upload. Then simply select the audio file and click copy located near the bottom centre of the screen.


4.) Once completed close p2k Commander, Motorola PST, disconnect your phone from the computer and then restart your phone. Now you can navigate to the ringtone on your phone using the "Media Gallery" and set it as a ringtone.

Method 2: BitPim

Coming soon!

Important Howard Forum's Posts...

Here's a list of commonly visited threads on Howard Forums on the v3c...

Seem Editing - http://www.howardforums.com/showthread.php?t=838061

v3c Games - http://www.howardforums.com/showthread.php?t=843042

Unbranding - http://www.howardforums.com/showthread.php?t=843101 (specifically contains changing the startup/shutdown images/animations)

Editing Outside LCD Picture - http://www.howardforums.com/showthread.php?t=849924

Startup and Shutdown Image Customization

This is an extremely easy edit. Firstly you will need BitPim (p2k Commander will work, but it tends to be very unstable). You can download BitPim from http://www.bitpim.org/.

Once you have the program installed open it up and select "Edit>Settings" in the toolbar. You will see this screen.


Make sure under "Phone Type" you have it set for "Other CDMA Phone". Beside Com Port select "Browse". You will see a screen like below...

Ensure you have the "Motorola USB Modem" selected. Your computer, if it's smart enough, should have installed the drivers for the phone itself, which would have included the forementioned modem. Once you have selected the appropriate modem select "Ok" and then select "Ok" again.

Now navigate to (by clicking the plus signs beside the folders on the left) /motorola/shared/picture as shown below...


You will also see above the two highlighted files you will be replacing to change the startup/shutdown animations. Customer_opening.gif is for the startup and customer_closing.gif is for shutdown. I would recommend right clicking on the file you plan on replacing and saving it to your computer in case you wish to restore the original graphic later. Once saved right click again and delete the file. Now replace it with the graphic you wish (should be the same size as the orignal and a gif), make sure you rename it to what the original file was called, by right clicking on the folder (on the left hand side) picture and clicking "New". Browse to the new graphic and select it. It will now upload to your phone. Restart it and you should see the changes!

Tuesday, February 14, 2006

v3c Seem Editing

Seem editing on the v3c can allow you to change some of the programming of the phone. The currently discovered seems are listed below:

To enable the keylock on the phone, the ability to put clr and * to lock all the keys on the phone (including the outside buttons) you need to set seem 2742 offset 29 bit 1.

To enable to option to have no sound while taking pictures you need to set seem 2742 offset 005e bit 6.

You can edit the outside LCD while in use message (from Telus) by editing seem 2771 rec 1 length 30.

Video quality adjustment seem is in seem 2742 offset 5f bit 7

Lens exposure adjustment is in seem 2742 offset 60 bit 4, range -2 to +2

________________________________________________

The programs that I use to edit seems on the v3c are p2k Manager and p2k Seem. You can download p2k Manager here and p2k Seem here. You will also need Motorola PST to help p2k Manager work. Unfortunately, that material is "restricted", however I am confident that if you search on one of the major search engines or a p2p network you will find it.

Instructions for Editing Seems:

1.) Start Motorola PST Phone Programmer
2.) Start p2k Manager
3.) Enter the seem numbers in the "Seem" area (shaded below) of the program... ie 2742 to 2742


4.) Click on download and the program will ask you where you want to save the seem to. Select a location where you will be able to find it later and click save. Do not edit the file name (xxxx_yyyy).

5.) If everything works the way it's supposed to, the computer will have downloaded the selected seem to the direct chosen.

6.) Now open p2k Seem, don't bother closing p2k Manager, you'll need it in just a sec.

7.) Click "Load from File" in the right hand bottom corner. Select the seem you just saved. A bunch of garbage will come up on the screen. Click inside the garbage to scroll through the offsets (as shown below). Use your right arrow key until you see the offset you are looking for listed in the area shown below. Put a checkmark in the proper bit as shown below.


8.) Click "Save to File" in the bottom right corner of the screen. I recommend saving it to a seperate location from the original seem, that way if something goes wrong you still have the original intact. I also recommend naming the file seemnumber_0001 (ie 2742_0001).

9.) Switch back into p2k Manager. In the shaded area below enter the seem number that you've been editing in the box beside "seem". Don't worry about entering anything in the box beside "rec". Click on "Upload Seem" and select the file you just saved using p2k Seem. The program will now upload the updated seem to your phone. Upon completion close p2k Manager, p2k Seem and Motorola PST. Disconnect your phone from the computer, turn it off then turn it back on. You phone is now updated!

So to recap the currently known seem edits...

Key Lock - Seem 2742 offset 29 Bit 1

Shutter Sound - Seem 2742 offset 005e Bit 6

Outside Banner - seem 2771 rec 1 length 30 (instructions above do not explain how to edit this one).